Sharepoint
Presentation
Sharepoint is a content Management system which provide a lot of features for designing websites such as intranets, professional websites, blogs, home pages.
It can be configured to authenticate users with OpenID Connect.
New in version 2.0.16: Because Sharepoint requires support for the OAuth 2.0 Form Post Response Mode feature, it only works starting with LemonLDAP::NG 2.0.16 and above
Warning
Configuring Sharepoint for OpenID Connect is a complex operation which requires some familiarity with Microsoft products, and a good knowledge of OpenID Connect. This documentation is only meant to help you configure LemonLDAP::NG to work with Sharepoint, but is not a complete, up-to-date walkthrough.
Configuration
LemonLDAP::NG
Make sure you have already enabled OpenID Connect on your LemonLDAP::NG server.
Make sure you have generated a set of signing keys in
OpenID Connect Service > Security > Keys
The signing public key must be in BEGIN CERTIFICATE format, check the OIDC certificate conversion instructions for details if you are currently using a public key in BEGIN PUBLIC KEY format.
Add a Relaying Party with the following configuration:
Options > Basic > Client ID : choose a client ID, such as
my_client_idOptions > Basic > Public client : set to
EnabledOptions > Basic > Client Secret : leave empty
Options > Basic > Allowed redirection address :
https://spsites.contoso.local/(adjust to your own URL)Options > Advanced > Force claims to be returned in ID Token :
OnOptions > Security > ID Token Signature Algorithm :
RS256
Define Scope values content:
email=>http://schemas.xmlsoap.org/claims/CommonName http://schemas.xmlsoap.org/ws/2005/05/identity/claims/givenname http://schemas.xmlsoap.org/ws/2005/05/identity/claims/surname http://schemas.xmlsoap.org/ws/2005/05/identity/claims/emailaddress
Define exported attributes:
http://schemas.xmlsoap.org/claims/CommonName=>cn(or LemonLDAP variable containing the common name)http://schemas.xmlsoap.org/ws/2005/05/identity/claims/givenname=>givenName(or LemonLDAP variable containing the given name)http://schemas.xmlsoap.org/ws/2005/05/identity/claims/surname=>sn(or LemonLDAP variable containing the surname)http://schemas.xmlsoap.org/ws/2005/05/identity/claims/emailaddress=>mail(or LemonLDAP variable containing the email)
SharePoint
Refer to the Microsoft Sharepoint OpenID Connect documentation for instructions.
You do not need an Azure AD or Azure ADFS, so you can skip the steps regarding Azure AD/ADFS. You should not need to configure the identity provider manually. If you use LemonLDAP 2.0.16 and above, with a certificate as your OIDC signing key, the OpenID Connect JWKS document should contain the x5c field expected by sharepoint.
First you need to create a Web application through the Sharepoint Manager A web application could contain several site ( called “collection”)
The authentication method is applied to a web application and collection behind
All URL of each site must be declared as an allowed redirection address in LemonLDAP::NG
You need to execute a powershell script which :
defines claims
defines metadata url
defines ClientID
defines Service account of website
generates a certificates for cookie
generates an Token Issuer objects
generates an Authentication Provider from Token Issuer
Here is a sample script, make sure to adapt it to your needs, and always refer to official Microsoft documentation if you have any doubts
# set the owner of Web application Pool see : you could get it through the
# IIS interface > Application Pool
# You could pick the owner of the corresponding Web Application
$webApplicationPoolUser="DOMAIN\user"

# Set the AAD metadata endpoint URL. Please replace <TenantID> with the
value saved in step #3 in AAD setup section
$metadataendpointurl = "https://auth.lemonportal.org/.well-known/openid-configuration"

# Please replace <Application (Client) ID> with the value saved in step #3
# in AAD setup section
$clientIdentifier = "APP-ID"

# list of Claim types

$email = New-SPClaimTypeMapping "http://schemas.xmlsoap.org/ws/2005/05/identity/claims/emailaddress" -IncomingClaimTypeDisplayName "EmailAddress" -SameAsIncoming
$cn = New-SPClaimTypeMapping "http://schemas.xmlsoap.org/ws/2005/05/identity/claims/CommonName"-IncomingClaimTypeDisplayName "CommonName" -SameAsIncoming
$sn = New-SPClaimTypeMapping "http://schemas.xmlsoap.org/ws/2005/05/identity/claims/surname" -IncomingClaimTypeDisplayName "surname" -SameAsIncoming
$givenName = New-SPClaimTypeMapping "http://schemas.xmlsoap.org/ws/2005/05/identity/claims/givenname"-IncomingClaimTypeDisplayName "givenName" -SameAsIncoming


#
#   CERTIFICATs FOR Secure COOKIE
#   certificats and key muste be exported and spread on each sharepoint server in farm
#
#

# Setup farm properties to work with OIDC
$cert = New-SelfSignedCertificate -CertStoreLocation Cert:\LocalMachine\My -Provider 'Microsoft Enhanced RSA and AES Cryptographic Provider' -Subject "CN=SharePoint Cookie Cert for LLNG Demo"
$rsaCert = [System.Security.Cryptography.X509Certificates.RSACertificateExtensions]::GetRSAPrivateKey($cert)
$fileName = $rsaCert.key.UniqueName

# if you have multiple SharePoint servers in the farm, you need to export
# certificate by Export-PfxCertificate and import certificate to all other
# SharePoint servers in the farm by Import-PfxCertificate.

# After certificate is successfully imported to SharePoint Server, we will
# need to grant access permission to certificate private key.

$path = "$env:ALLUSERSPROFILE\Microsoft\Crypto\RSA\MachineKeys\$fileName"
$permissions = Get-Acl -Path $path

#Please replace the <web application pool account> with real application
# pool account of your web application
$access_rule = New-Object System.Security.AccessControl.FileSystemAccessRule($webApplicationPoolUser, 'Read', 'None', 'None', 'Allow')
$permissions.AddAccessRule($access_rule)
Set-Acl -Path $path -AclObject $permissions

#Then we update farm properties
$f = Get-SPFarm
$f.Farm.Properties['SP-NonceCookieCertificateThumbprint']=$cert.Thumbprint
$f.Farm.Properties['SP-NonceCookieHMACSecretKey']='seed'
$f.Farm.Update()


# Create a new SPTrustedIdentityTokenIssuer in SharePoint
$spTrust = New-SPTrustedIdentityTokenIssuer -Name "LemonLDAP_DEMO" -Description "lemonldap Demo" -ClaimsMappings $email,$cn,$sn,$givenName -IdentifierClaim $eppn.InputClaimType  -DefaultClientIdentifier $clientIdentifier -MetadataEndPoint $metadataendpointurl  -Scope "openid email"

# Declare a SPAuthenticationProvider from SPTrustedIdentityTokenIssuer
$trustedAp = New-SPAuthenticationProvider -TrustedIdentityTokenIssuer $spTrust
After that you need to assign the new SPAuthenticationProvider to the Web application
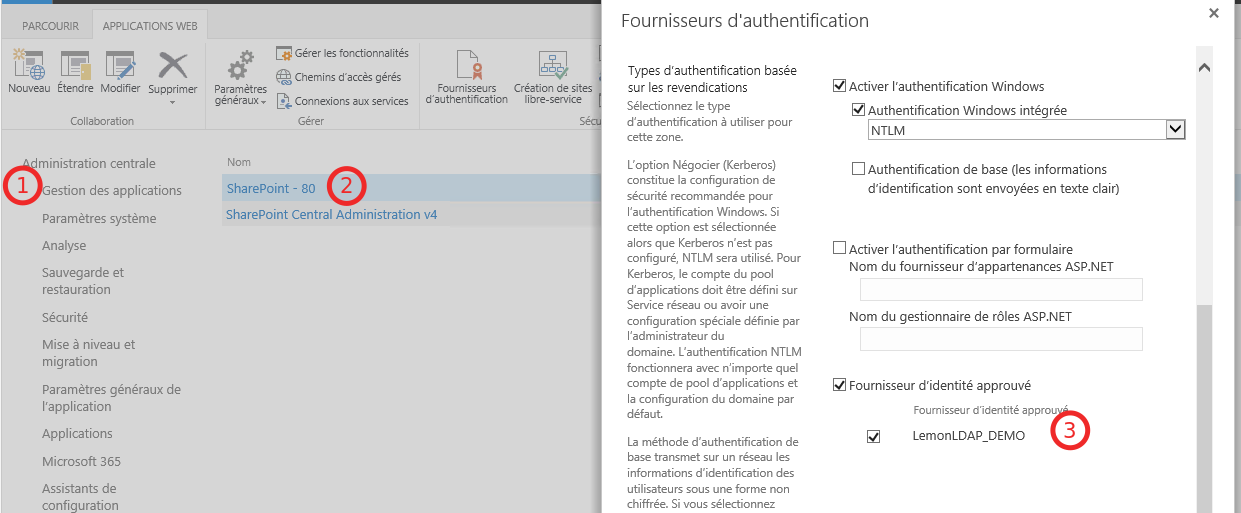
At this time you should restart IIS and the website
By the way, despite you are authenticated, you could note access to Web site , you need to be authorized, It’s a website’s administrator job. Pay attention ! If you need to add a user, you must set the identifier of the user inside the searchbox and clique “OK”
Troubleshooting
If you got an error and the web page is displaying nothing relevant, see the URL Example in case of lack of sub
<url>/_layouts/15/_login/default.aspx?errorCode=TrustedMissingIdentityClaimSource=<link source>